Saturday, 31 October 2020

Planning for 2021: Raranga Matihiko supporting school and curriculum leaders

COVID-19 has proven a challenge for all educators and for PLD providers. Thanks to the foresight of our Programme Director Tara Fagan, the Raranga Matihiko team were able to move online immediately when the March lockdown was announced to continue supporting our schools and kura, and certain aspects of our work have remained online since then.

During Term 3, Tara Fagan and I have facilitated four webinars for school and curriculum leaders from all across the motu:

  1. Understanding the revised Technology learning area
  2. Integrating digital technology into your local curriculum
  3. Is your school ready for Digital Technology learning?
  4. Digital Technology learning in action

Each of these webinars has been recorded and is available under Leadership on the resources section on our website.  Following lots of positive feedback from participants, we have decided to offer a follow-up webinar series in Term 4 to support schools as they plan for 2021:


Please register at http://bit.ly/T4RM2020; feel free to attend one, some or all of the webinars. These webinars are free for educators from all schools and kura across Aotearoa. Please note that in addition to the Raranga Matihiko programme, we also support schools with accredited PLD, notably in local curriculum design, digital fluency and around NZ History - feel free to get in touch if you are interested to find out more.

Of course we haven't forgotten about classroom teachers: During Term 2 we wrote and presented 16 episodes for Papa Kāinga | Learning from Home TV, including supporting teacher resources. These are also available from our website under Raranga Matihiko TV. In addition we ran a free online conference at the end of September, and we were absolutely blown away by the huge interest. If you missed out, or if you would like to rewind the learning, please head over to Webinars on the resource section on our website.

Sometimes, a challenge can lead to something positive, it can lead you to challenge what you do day-to-day, push you to come up with a new, hopefully better way. As you are planning for 2021, we trust these resources can support you. Come back to our website regularly for updates and new additions.


Saturday, 1 August 2020

Designing tasks that allow students to shine

Digital Technology learning does not happen by accident. Lately I have been thinking a lot about how we can design student tasks that truly allow our students to show their progressing learning in Digital Technology. I have previously written about integrating digital technology learning across the curriculum (probably most of the more recent posts on this blog, e.g. Integrating DT Learning into Learning from Home). As teachers we often wonder how to balance developing the students' digital fluency (DF) skills and setting them tasks that challenge the students to apply these skills in an authentic context and for their chosen audience.

As I have said many times, Digital Technology (DT) learning needs to be across the curriculum, every teacher needs to take responsibility for developing some basic digital fluency of their own, for developing a basic understanding of the revised content of the Learning Area Technology, and for integrating DT learning into the learning in their context. I realise this is not easy to fit into an already busy day, so please look into the PLD that is available to you and reach out in person or online to colleagues or to PLD facilitators you think are able to help you. I know that some schools have had different priorities before, during and since lockdown, and PLD for Digital Technology and for Digital Fluency have now fallen off the MoE PLD priorities. If you feel strongly that this is not meeting your needs and therefore the needs of your students, speak to your Senior Teachers / HoDs, your schools' SLT and to your local MoE Senior Advisors.

While I might be slightly biased, I feel looking at the 'decoded for learners' version of the DT Progress Outcomes might not just help students, it might also help teachers. With the recent update to our website, the location of our Decoded for Learners resources shifted; for now, you can access them here:

So how do you design tasks that allows students to show off their DT progress, and how do you allow the students to develop more digital fluency (DF) so they can work at higher progress outcomes?

Developing digital fluency
In our Raranga Matihiko (RM) programme at Waitangi, we always start with a tutū session, a short session where students first get a basic introduction what a tool can do, and then get time to simply try that tool out. As we get students into our programme for a very limited period of time only, we organise this in rotations of approx. 5min, swapping across several different apps and tools - you might want to introduce fewer tools over a longer period of time. Buddying up can be useful, and as the teacher, it pays to listen in to their conversations.

Choosing tools that are free to use and / or available across a range of devices helps with equity between students. If you are unsure about what tools you could introduce or how to introduce them, feel free to get inspiration from our clips from Raranga Matihiko TV which were recorded for Home Learning | Papa Kainga TV - or, if appropriate, use them directly with your students. The accompanying Teacher Support Materials are available here.

Following a tutū session, we have a conversation with students about the tools they have used and about what would be the best tool for a particular purpose. E.g. if I want to create whakairo (carvings) that I can print out in a 3D printer, SculptGL is a very good tool (I have written about choosing the best tool here). Here is an unplugged activity we have developed for you to use with your students to help them think about choosing the best tool.

With this approach you help students develop their DF and they will learn to choose the most suitable tool from a  range (Progress Outcomes 2 and 3 from Designing and Developing Digital Outcomes).

Task design
Digital Technology learning sits under the Learning Area Technology. In its most simplistic form you could describe the purpose of Technology to provide a solution to a problem. 
All Progress Outcomes refer to authentic context and to an enduser. Let me be very blunt: In all but a very few instances, creating a DT project for the teacher to mark does not meet either of these. Instead when integrating DT across the curriculum, this could be creating a movie about a pūrakau for a whānau evening, coding a project to share a story digitally with young people across Aotearoa, creating an app to guide a visitor across the school grounds etc.

When you truly integrate DT learning across the curriculum, you look at learning, at authentic learning, within the local curriculum of a school first. Local curriculum has become more and more important in NZ education, and MoE have made a number of resources about this available, for example here.
Local curriculum is about ensuring that what students learn about is important to them and their local community, while at the same time using this as the springboard to understanding the world beyond their local area. For me it is providing students with a solid grounding in their local community, their local history, their local tikanga, the local environment, and developing a connection and a pride in where they are from. This means that while our schools might still be a central hub for learning (though possibly no longer sole place of learning), we invite the knowledge and skills in the community to be a partner in the learning journey, and we all, students and adults, learn together (there is much more to local curriculum, but this will be the topic of another post at another time).

Digital Technology learning can be one of the ways your students show their learning. Designing and Developing Digital Outcomes and Computational Thinking are often interwoven. Depending on the age of your students and on their DF skills, design tasks that:
  • Require an enduser: Who will see their project and what are their needs (e.g. younger students might need few and simple text)? How will you facilitate sharing their projects (class or student blogs, school FB page, whānau evening etc.)?
  • Allow students choice about how to show their learning, e.g. within a tool (if their DF is limited to this) or across several tools. Ask students to explain why they are choosing particular tools.
  • Include application of  Digital Citizenship (DC): Model good DC in the way you access online content and how you attribute the source of this content. Incorporate requirements for displaying DC in the student projects.
  • Encourage students to push beyond what they already know and beyond what you know. Collaborative brainstorming can be very useful, as can be collaborative projects (buddies and small groups). Embrace ako and celebrate success.
My last post had some task ideas for Learning from Home - some of these translate easily to the classroom environment. Over the coming weeks I plan to share further exemplars about tasks that allow students to shine - feel free to contact me if you would like your activities included in this.


Sunday, 26 April 2020

Integrating Digital Technology learning into Learning from Home

First up I want to say how thankful I am to all those teachers out there who are out there doing their best to support their students learning from home. The next step, some students learning from school again, must surely be daunting to a few teachers and students. No doubt the first little while at least will be nothing like our old normal, and only time will tell what our new normal will look like.

Many people (including me) fall back to the tried and true when in a challenging situation - and I think education (like most things in our lives currently) could well count as challenging. Given the 'new and revised learning area technology' (there's a mouthful for you!) only became compulsory at the beginning of this year, it probably doesn't count as tried and true for everyone yet. To make it easier on teachers, I have come up with a few ideas for teachers to help them integrate Digital Technology learning into their students' learning from home.
_____________________________________________________
Curriculum
A quick reminder of the difference between Digital Literacy and Digital Fluency curtesy of my colleague Elaine from Waikato Museum:


Digital Technology learning goes beyond Digital Literacy and Digital Fluency. In the NZC it is described through Progress Outcomes, and to make them more accessible to learners, we have now published them in our Decoded for Learners series.  This tool has been designed as a guide for learners to the language and concepts used in Computational Thinking and Designing and Developing Digital Outcomes.  Learners can be working on multiple progress outcomes at one time. While it breaks the progress outcome into several statements, it is not a checklist to work through, nor is it a replacement of the technology curriculum progress outcomes for Computational Thinking or Designing and Developing Digital Outcomes. Please use the link or the QR code to access the Series.

Here are some examples:

Computational Thinking POs 1 & 2 decoded for learners

Designing & Developing Digital Outcomes PO 1 decoded for learners

When you read the Progress Outcomes (original version or supported by the decoded for learners series), you can clearly see that tasks need to be designed very deliberately to allow students to move through the progress outcomes. When designing these tasks for learning at home, there are a number of variables to keep in mind:
  • Does the students have access to a device and the internet?
  • How confident is the student in applying their DT learning?
  • What support in regards to DT learning do you need to provide to students and their parents?
_____________________________________________________

Some ideas for Learning Activities
Learning is rarely isolated to just one Learning Area. The following are learning activities I have seen or I could imagine being set while learning from home, and I have integrated Digital Technology learning into these.

Choose a simple meal or snack idea (e.g. peanut butter sandwich, toasties, pikelets etc.). Record all the steps to make this meal or snack (in writing, pictures, audio recording, or mixture of these). Give your instructions to member of your bubble and observe them make your snack. Take note of any mistakes in your instructions as they follow them and correct your instructions.
Computational Thinking PO1

Create instructions as above, then swap them with another student so everyone gets to follow each others' instructions. Find and fix any mistakes.
Computational Thinking PO2

Choose a toy or an object in your house. Create or draw a background and make up a story about XYZ featuring your toy / object. Use Stop Motion animation (e.g. Stopmotion Studio) to make the story come to life.
Computational Thinking PO2
Designing & Developing Digital Outcomes PO1

Māori didn't use to write down stories, whakairo, kowhaiwhai and tukutuku were some of their ways to tell stories. Tell a story about a happy day through whakairo: Use SculptGL to create your carving. Take a screenshot of your finished taonga to share with the class.
 Designing & Developing Digital Outcomes PO1

Create your whakairo as above. In a digital painting app like Google Drawing, Autodraw or Paint 3D, create a background for your carving, then import it into SculptGL. Arrange your carving in front of your background, and when you are happy with the final result, take a screenshot.
Designing & Developing Digital Outcomes PO2

Your whānau needs something to help do chores around the house. Design a gadget suitable for your home: It needs to be safe for all ages and it needs get to all areas of your house.
You need to show your finished gadget from different sides and explain what it does. Choose from Tinkercad, Google Drawing, Autodraw or Paint 3D or another app you are familiar with. Your explanation can be in writing or verbal.
Designing & Developing Digital Outcomes PO2


We all know that washing hands is important, now tell a Scratch sprite about washing hands.
You will need to use two sprites, you can choose any background from the library. Your code needs to include movement and speech. Make sure you debug your code so the story makes sense.
Computational Thinking PO3
Designing & Developing Digital Outcomes PO1

It is autumn and mice are looking for a warm home over the winter. Help the cat sprite catch mice that have come into its home!
Create a Scratch project where mice are moving around a house, then code the cat so that it chases and catches the mice. Design your code so that the mice disappear when the cat has caught them (you might want to use the If-then block).
Computational Thinking PO3/4
Designing & Developing Digital Outcomes PO1/2

Imagine you and your whānau bubble are on a journey to Mars. Record a vlog of a day / of several days.
You will need to create a script. You also need to create a background for your vlog e.g. the inside of your spaceship (use a 2D or 3D design tool of your choice). You can use a Greenscreen tool like Greenscreen by Do Ink on the iPad or OBS Studio on the Laptop. Think of any props from around the home which you can use to help tell your story.
Computational Thinking PO2
Designing & Developing Digital Outcomes PO3
_____________________________________________________

I hope some of these might be helpful. If you end up using any of my ideas as inspiration, feel free to let me know in the comments what your Learning Activities and / or your students's creations looked like!


Wednesday, 13 November 2019

Not just Coding for the sake of Coding: Digital Storytelling in Scratch

In October I ran a workshop on using Scratch as a tool for digital storytelling at Ulearn19 in Rotorua. As part of this I introduced the participants to our kids speak version of the Progress Outcomes for Designing and Developing Digital Outcomes as well as Computational Thinking (see this previous blog post). Here is my slide deck  from the workshop:


Digital Technology Progress Outcomes in Kids Speak

Earlier this year I starting a new professional inquiry, looking at how we could support teachers to get a better understanding of the newly added curriculum content for Digital Technology in the learning area Technology. As part of this I wondered if a Kids Speak version of the Digital Technology Progress Outcomes (like we have for Literacy) could support learners and teachers to gain a better understanding of what is required and for learners to be able to take more ownership. Tara Fagan and I drafted a kids speak version and we trialed it during October; this draft is available to download here. Please share your thoughts via comments or by emailing rarangamatihiko@tepapa.govt.nz. 


Monday, 12 August 2019

Choosing the best tool for the purpose

The Progress Outcomes for Designing and Developing Digital Outcomes include for students to learn about choosing the best tool for solving a technological problem:

Progress Outcome 2
In authentic contexts and taking account of end-users, students make decisions about creating, manipulating, storing, retrieving, sharing and testing digital content for a specific purpose, given particular parameters, tools, and techniques. They understand that digital devices impact on humans and society and that both the devices and their impact change over time. Students identify the specific role of components in a simple input-process-output system and how they work together, and they recognise the “control role” that humans have in the system. They can select from an increasing range of applications and file types to develop outcomes for particular purposes.

Progress Outcome 3
In authentic contexts, students follow a defined process to design, develop, store, test and evaluate digital content to address given contexts or issues, taking into account immediate social, ethical and end-user considerations. They identify the key features of selected software and choose the most appropriate software and file types to develop and combine digital content. Students understand the role of operating systems in managing digital devices, security, and application software and are able to apply file management conventions using a range of storage devices. They understand that with storing data comes responsibility for ensuring security and privacy.

For my Professional Inquiry during Term 2 I chose to focus on students choosing the best digital tool for a particular purpose, while keeping in mind that many teachers are time poor, often have limited access to digital technologies in their classrooms and some teachers lack confidence in their using Digital Technologies effectively in learning and teaching. How can I enable students to make such choices while showing their teachers that with some guidance you can students go beyond what the teachers know or feel confident in?

Here is the link to my Professional Inquiry Plan for anyone who is interested to see the full process I went through. This is a summary of what I found effective in the Raranga Matihiko programme:
  • Running a structured tutu session for the students where they can explore the different tools - encouraging the teachers & adults to have a turn also
  • Holding a conversation with them about how to choose the best tool for a particular purpose
  • Designing tasks in a way that allows students age-appropriate choices
  • Engaging the teachers in conversations about their students' choices, also how they can apply this in their own practice back in the classroom

___________________________________________________________


As a teacher you might wonder what this could look like in your own classroom. Here are some ideas inspired by what I found during my inquiry:

  1. Think about your inquiry topic; what could be some digital creations your students could make to show their learning? How can you set up the task(s) so you students have age-appropriate choices?
  2. Research possible digital creation tools; some tools we enjoy using are Tinkercad (3D creation tool), Paint 3D (Windows 10 only; for images, photo manipulation, 3D objects, Mixed Reality creations), SculptGL (3D sculpting), Stop Motion Studio for stop motion animation, Scratch to code digital stories, Green Screen by Do Ink for green screened images and movies.
  3. Have a tutu yourself :) remember you don't have to be an expert, you just have to know the basics, your students will explore beyond that.
  4. Set up a structured tutu session for your students. I suggest you select a limited number of tools, set up some different stations in a way that students physically have to get up and move from one station to another - this seems to help some of them with remembering the names of the tool and what they did with these tools.
  5. Run your tutu session: Run through all of the tools you want them to explore with the whole group first; use online tutorials or demo a few functions for each programme. Split your students into manageable groups; just keep in mind how many people you can accommodate at each station. For example, if you have 5 stations, with 30 students you end up with 6 students per group. Depending on the personalities of your students and on the class culture, working in pairs can be really useful - in this case you need to set up 3 devices at each station. Use an audible timer to help with swapping from one station to the next, 5-8 minutes per station works well for us.
  6. After the tutu session, discuss the different tools and what they would best be used for, e.g. a stop motion animation needs inanimate objects (otherwise you might as well just video the action). SculptGL is great for creating carvings, but it is much harder to make a building. Go beyond the app or programme to the tools inside, e.g. within ScultGL, 'crease' is better for creating carvings than using 'paint'.
  7. Have a conversation about 'cool' versus 'best tool: In our context we usually talk about their transport to the Treaty Grounds - was this the coolest way to get here? What would be a cooler mode of transport (I think we've heard it all, from helicopters to limos to waka to unicorns to jetpacks and much more). In the end we usually agree the bus was the best, though not necessarily the coolest way.
  8. Give your students opportunity and permission to make their choices and get creating- sometimes the best learning comes from not making the best choice first, and then swapping to a more suitable tool.

I would love to hear from you how you enable your students to choose the best digital tool for the purpose.

Sunday, 23 June 2019

Computational Thinking for Upper Primary / Intermediate School using Scratch

Following on from my post from last week about introducing Computational Thinking in the junior classroom, here are some thoughts on where to start for teachers of Upper Primary and Intermediate School.

Like for the juniors, I would always start with the teachers understanding the revised curriculum content.  With that I mean not just the Progress Outcome that might appear to be aligned with the CL most of your students are working on, but Progress Outcomes 1 - 5 as their alignment against curriculum levels is subject is still tentative. My previous blog post contains suggestions where you can get help with this - or you might want to start as simple as carefully reading the PO descriptions, noting down similarities and differences between the different levels and work out unfamiliar terms (and there is lots of jargon built into these brief paragraphs...).

Again, it really important that you acquire a basic understanding of coding, it is another form of literacy that our students need to become familiar with. As I said in my post last week, I personally like https://code.org/, it has given me a good starting point in block coding which in my opinion is all that you need to know about for this age group. From there, familiarise yourself with Scratch (if that is the platform you choose to use with your students).

At this age I would still start the students off with unplugged activities to get them thinking 'like a computer', just add a layer of complexity to it in comparison to the juniors. CS Unplugged is a great source of ideas.
One of the activities we do in Raranga Matihiko at Waitangi is based on an idea we first saw facilitated by Rosalie Reiri at a Kia Takatū workshop: Programming a tohu to move across a grid to a selected destination with the instruction to get there as fast as possible = using as few lines of code as possible.
We use a clear plastic sheet with a grid drawn on it (greenhouse plastic from your garden centre) and students move tokens of your choice to the destination they have chosen, only using the instructions of 'move forward', 'turn left' and 'turn right'. They are encouraged to use iteration/repeat such as 'move forward x5'. For this age group we add a second priority: While you move across the grid as fast as possible, collect as much money as you can -> in case of a draw between different players in the end, the person with the most money will win. OR you can make any variation of this and other ideas you have to get their brains thinking 'like a computer'.


While code.org have a lot of interesting pre-set courses, for this age group I would straight move them to a a platform like Scratch. Start with a good 'tutu', let them figure out what they can do on there. Here are some ideas for you:

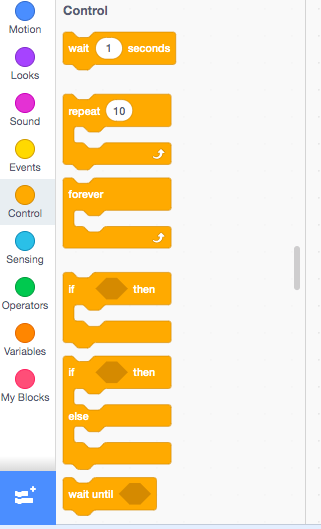
Suitable code blocks to start with include:


Remember that the code is always attached to a particular Sprite (if you delete the Sprite, your code is gone! I suggest you teach your students to take screenshots periodically so they have a copy just in case). Select the Sprite, then drag blocks from the left onto your workspace in the middle of the screen. Connect them together (just bring them close, they act like they are magnetic and attract each other). Ensure you always start with an event block, most commonly When green flag clicked:

One of the absolute must have blocks is go to x:___ y:____ (found under the motion blocks), it should be placed at the beginning of a project right under the event block that starts it all off. This ensures that the Sprite always starts in the same place.

Apply iteration and reduce the number of lines in a program:

Both of these algorithms do exactly the same thing...

... but this one uses fewer lines of code = less chance to make a mistake while writing the program

There is a wide range of Backdrops and Sprites students can use for their projects, but here at Waitangi we prefer students to create their own.


While we tend to create Backdrops and Sprites in other programs such as Paint 3D, Scratch includes tools to create your own (just select the brush you see above), or to edit existing ones (including your own uploads):

Click on the Sprite you want to edit (highlighted in blue here at the right), then select the second tab Costumes at the top to make changes to the way your Sprite looks or to create additional costumes for your Sprite

Click on Stage instead of a Sprite and the second tab at the top becomes Backdrops.
Handy hint: Look at Stage, the number under Backdrops indicates how many different backdrops are loaded into the project. You might want to delete backdrops that are not needed or are duplicates.

Costumes can help animate a project. Have a look at the subtle difference between these two projects:


Hiding and showing different Sprites can have its own little challenges: Anytime you use a hide block in your code, you also need to include a show block. While this might seem counter-intuitive to you, it makes sense in computational thinking: Imagine playing hide and seek with a robot, and you tell the robot to hide. Unlike our students it won't get bored or hungry and come out anyway, it will hide forever UNLESS you tell it to show.


Timing can be very important; if your students are writing more complex code where something new happens after a particular event, or after a certain amount of time, look at broadcast message.


Found under events, broadcast message can set in motion a new sequence of events:
As you can see, the workspace can include more than one sequence of code: On the left the command for the mouse to hide at a certain place as soon as the green flag is clicked. On the right, after receiving the message which I named Chase mouse it will show itself and forever move around the screen randomly.

On the left, the original code with a broadcast message block added at the bottom (to create a new message, just click on the drop down arrow and name your message something that makes sense to you).
On the right I added a new sequence of code: Once the cat receives the message, it miaows once, then waits for one second before it glides towards the mouse forever.
Below that I added a third block of code, not currently connected to any event block. If I drag this into my forever block below glide to mouse my program will stop when the cat touches the mouse - and there is lots more you could add here.


Managing and sharing Scratch projects

For the Raranga Matihiko programme at Waitangi we currently work under just one account in Scratch which allows us to manage all student work. We place all projects for a class into one Studio (= folder), and we share the URL to the studio with the visiting teacher. For this we have to 'share' each project, make it publicly visible which is covered under our parent permission forms. I have turned commenting off for projects created under the WaitangiMuseum Scratch account because we don't have enough time to monitor all comments to all projects.


To embed a Scratch project into a blog as I have done here you can use the following code:
<iframe allowtransparency="true" width="485" height="402" src="https://scratch.mit.edu/projects/embed/308725885/?autostart=false" frameborder="0" allowfullscreen=""></iframe> 
Instead of the yellow of the URL, add the number of the project you wish to embed.
Often students want to continue working on the projects they started with us so I encourage visiting teachers to set up their own class account or individual student Scratch accounts and use the Remix buttonto make a copy of the project in their own account:


This is also a good opportunity to reinforce Digital Citizenship, explore the ideas of Creative Commons as well as attributing where work comes from. Student might also be interested to explore other Scratch projects to learn from the code used there; however, I suggest you curate a selection of suitable projects (add them to a studio) so your students don't get lost in the thousands of projects available.